Tips for more helpful sketches
With a pair of scissors, a comb, and a mirror you probably can cut your own hair. But will it look as professional as if you went to a salon? Probably not (and I have the old photos to back it up). Similarly, just because somebody can draw straight lines on paper doesn’t mean that they’ll come up with a floor plan sketch that a designer can accurately translate into a set of real drawings.
This is not to say that I don’t want to see a client’s attempt to sketch what they’ve had in their heads. It takes a certain amount of courage to even try, like karaoke. You’re really putting your talents on show when you do! In fact, many successful projects have started this way: the client apologetically handed me a piece of graph paper with an explanation to the effect of “I don’t really know what I’m doing, but I think I want something like this”. Don’t stress out about it — you’re not the first client to take a chance on looking silly, and you won’t be the last. It’s not to scale and may not be on graph paper at all, but your scribblings can provide me with a general idea of which rooms you want near each other, and which spaces need to be on each floor of the house.
You don’t need to do a sketch at all — more on that at the end of this post — but if you want to ensure your sketches are as helpful as possible, here are some common pitfalls you should avoid.
A line does not equal a wall thickness.
This is a common graph paper sketch issue. A client draws a rectangle and divides it up with a pencil line to represent a wall, but doesn’t keep in mind that thickness of the wall itself has to be deducted from the size of the room. Then when the client sees their floor plan once I’ve drawn it, where I’ve kept the footprint of the building to the outside of the lines they drew, the rooms themselves are all mysteriously a few inches smaller in each direction. How could that happen? Remember that outside walls are almost always built from 2x6 studs and that interior walls are 2x4, so allow 6” for outside walls (2x6 plus sheathing) and 3-1/2” for inside walls. FYI, I don’t draw the 1/2” drywall - my floor plans are typically drawn to rough framing, and lines drawn 1/2” apart are impossible to read on paper at that scale anyway.
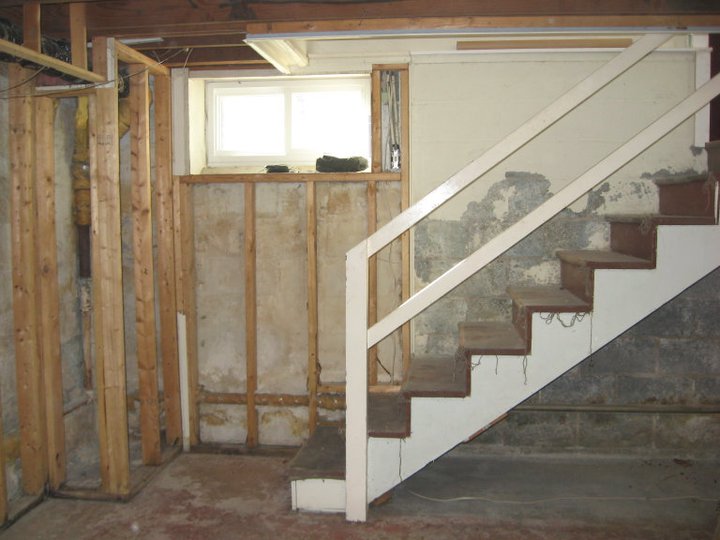
Staircases take up more square footage than you think.
Stair designs need to comply with many very specific building codes. Treads must be at least 10” deep from nosing to nosing, for example. Risers can only be 7-3/4” high maximum. Staircases must be at least 3’ wide finished. There needs to be 6’-8” minimum head clearance the entire length of the stairs. This means that staircases take up a lot of floor space, more than most homeowners assume. It also means that most of the stair can’t have living space directly above it (except for the first tread or two), otherwise you won’t meet the 6’-8” head clearance. Also, the higher the ceiling height on the lower floor — and the deeper the floor joists — the longer the staircase needs to be because there are more steps to reach from floor level to floor level. And staircases with winders or landings need special clearance at the inside of their treads. Suffice it to say that there are many code considerations so the more space you allow in your sketch for the stairs, the better.
Open spaces and staircases need to match on the first and second floors.
This may sound silly but I’ve had sketches given to me where the staircase was drawn on the first floor but it disappeared on the second floor and was replaced by a bathroom. If there’s a two-story foyer then the open areas need to stack on each other for the first and second floor. If there’s a wrap-around one story Victorian porch on the first floor then there cannot be a second story master suite occupying the same spot above it.
Make sure paths of travel are wide enough.
By code a hallway or walkway (between kitchen cabinetry for example) must finish at 3’ wide absolute minimum. As I design a home I’m keeping in mind how the people will move around in the space and I do my best to be sure you won’t have any bottlenecks. I’m also thinking about how easily you’ll be able to move large furniture down hallways and around corners.
Don’t sweat it when it comes to the precise layout of your hard-working small spaces...
Laundry Rooms, Mudrooms, Walk-in Closets and Bathrooms generally take a lot of careful planning because there’s usually not a ton of space to work with, there are permanent fixtures that need to be located, and they’re used by multiple people for various purposes. And with bathrooms, there are many codes you won’t know about. It’s better to just allow a general area on your sketch, maybe with a big question mark in it, and I can design something myself (after asking you many questions about what you need). I’ll make efficient use of each inch of these rooms so nothing’s wasted. The result is either that you’ll have more generously sized adjacent public spaces and bedrooms, or you can economize on the total square footage of the house or addition.
…or your kitchen.
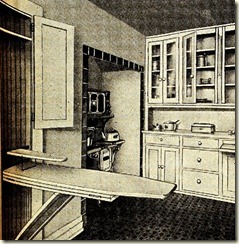
Again with the paths of travel issue, oftentimes an island is sketched into a kitchen space that’s not large enough to actually fit an island that can easily be walked around. Allow 2’ of depth for standard base cabinets, and then 12” absolute minimum for a counter overhang where you might have a barstool. You will eventually be working with a kitchen designer at a cabinetry showroom, and they will help you figure out the functionality of each cabinet (drawers, rolling shelves, trash cabinet, all that fun stuff). But for the purposes of the permit/construction drawings you’re paying me to draw, I’ll be planning the workflow of the kitchen between the sink, fridge, and range. Most kitchen layouts begin with where the kitchen sink and dishwasher will go — usually determined by a view out of a window or into a family room — so start with that, and don’t be overly concerned with exactly where the other appliances will go yet. We will talk it through and come up with a concept together. I’ll be sure you have adequate counter space next to your fridge, between your sink and your range, near your pantry, and where you’ll most likely drop the grocery bags when you come in from the garage.
Doors in public areas should not lead directly into private spaces.
Are you certain that you want the powder room door on a wall next to the TV in your living room? May I suggest access from a slightly more discreet hallway instead? Same goes for doors into bedrooms. I speak from experience, as my 1939 brick Colonial’s powder room door is in my kitchen, and much to my chagrin I can’t do anything about it without a very expensive remodel. Or a time machine.
Try not to get hung up on exact sizes for every single room.
The puzzle pieces that are the rooms of a house need to fit together just so, and some room sizes (especially closets) will be a natural consequence of adjacent rooms that needed to be a specific size. The final dimensions will never be exactly what you sketched for a wide variety of reasons — bearing wall needs to align over a beam, a duct chase needs to be incorporated into the layout, a wall needs to shift so that the windows on the front are balanced, your staircase didn’t fit the way you sketched it, etc. If you want a room to be a particular size so it can accommodate your massive sectional sofa or your large bedroom furniture, just let me know that and I’ll be sure to make it work for your needs.
The inside and the outside are two components of the same building (of course).
When I’m working on a design I’m thinking about how it will look from the exterior as I’m coming up with the floor plans. Just drawing a floor plan without thinking of the outside, you may be setting yourself up for an ugly house design. How balanced will the fenestration be? How will the rooflines go together? Structurally, will it be tricky and/or expensive to build a roof to fit over your building footprint? Somebody once showed me their graph paper sketch of a first floor design with no windows on the front of the house, "for privacy”. I didn’t move forward with that project because there’s no way to make a house without windows on the front of it look good and I couldn’t convince him that they were important. Another client showed me a small figurine of a fairy-tale style cottage (I think it was Thomas Kincaide) that, in real life, would be perhaps 500 square feet and perfect for a forest-dwelling princess, but she showed me sketches of a floor plan with a two-car garage, multiple bedrooms, and all the other rooms that a typically sized house would feature. No way could anybody get the inside to agree with her vision of the outside, which she was adamant about duplicating.
Don’t be daunted. Just be flexible and open to suggestions to tweak your design.

These tips may have left you feeling a little anxious and if so I apologize. I felt the same in my early architectural drafting classes when the teacher critiqued my floor plans. If sketching seems like more than you want to get into, a much better option would be to create a list of rooms you need on each floor, along with general guidelines for sizes. Not sure how much space you need? Then measure your existing rooms and let me know for each one how you feel about their sizes (too narrow? bigger than necessary?) If you already have in mind that certain spaces need to be oriented around certain other spaces, or if particular rooms should face a special view, let me know that as well.
A helpful companion to a list of rooms would be a simple bubble diagram with perhaps a limit to the house width and depth and a desired square footage size, similar to this. It’ll give me the creative freedom to fit your plan together without getting bogged down in trying to make all the aspects of a detailed but flawed sketch work out. Plus, you won’t have to spend hours and hours with a ruler, pencils, and eraser!